versaForms
versaForms is a new feature introduced in versaSRS version 7.1.5 and a substitution of the previous Forms module "Classic Form Creation Tool (FCT)". versaForms features a more user-friendly interface which allows Controls to be dragged and dropped into the Form design area. Custom Styles and Custom Scripts can be added to versaForms for a flexible and responsive design.
In order to use versaForms they must first be enabled in the versaSRS Global Settings.
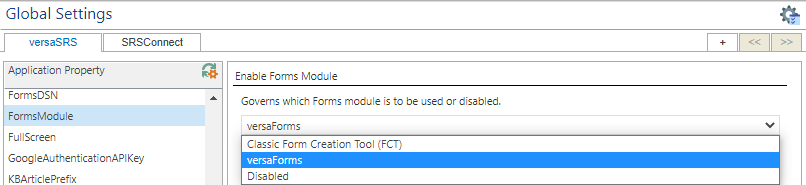
You must ensure that the Global Settings Application Property FormsDSN has a valid database connection string and the versaForms option is selected in the Application Property FormsModule (as shown above).
Note: The previous version of "Classic Form Creation Tool (FCT)" is still available. It can be enabled by selecting the FCT option for the FormsModule Application Property.
Table of Contents
Click one of the below links to go directly to that section:
- Launching versaForms in versaSRS
- versaForm Library
- Form Properties tab
- Authoring Access
- Control Properties tab
- Control Choices tab
- My Forms in SRSConnect
- Common Errors
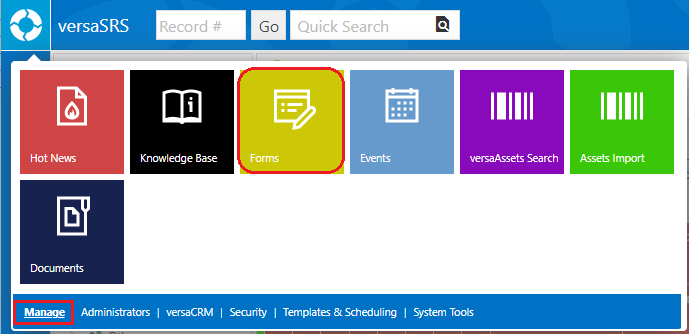
Launching versaForms in versaSRS
A versaSRS User who has been granted access to manage versaForms can access the Library by selecting the Forms icon on the versaSpinner - Manage tab.
versaForm Library
When the versaForms module launches you will first see the versaForms Library where you have the ability to add new Forms, Edit, Delete, or Clone existing Forms, Review and Complete a Form, and Check Submission Results.
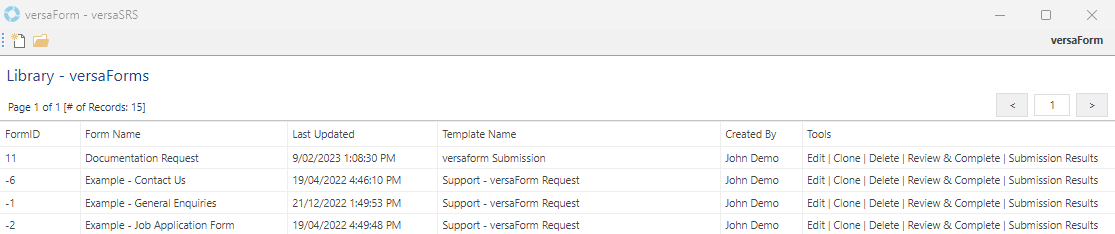
The versaForms Library contains the following columns:
| Property | Details |
|---|---|
| FormID | The ID of the Form, every Form has its own unique FormID |
| Form Name | The name of the Form |
| Last Updated | The date of the last update to the Form |
| Template Name | The Case Template used for the Form. If there is no Template set for the Form, no Case will be created |
| Created By | User who created the Form, this person can grant Authoring Access to other Users |
| Tools | Edit - Allows the Form to be edited Clone - Selecting this will an create exact copy of the Form Delete - Allows deletion of the Form Review & Complete - By selecting this saved Forms can be reviewed and submitted Submission Results - All submitted results of the Form can be viewed, edited, and deleted |
The icon functionality available is as follows:
| Icon | Description |
|---|---|
New  |
Create and open a new Form |
Open  |
Go to the versaForms Library |
Preview  |
Opens the Form as it will be displayed in the browser. Allows you to confirm the layout and controls are appearing as expected. |
Change History  |
View each saved version of the Form and easily revert to a previous version of the Form |
When creating new or editing existing versaForms, the versaForm window is displayed.
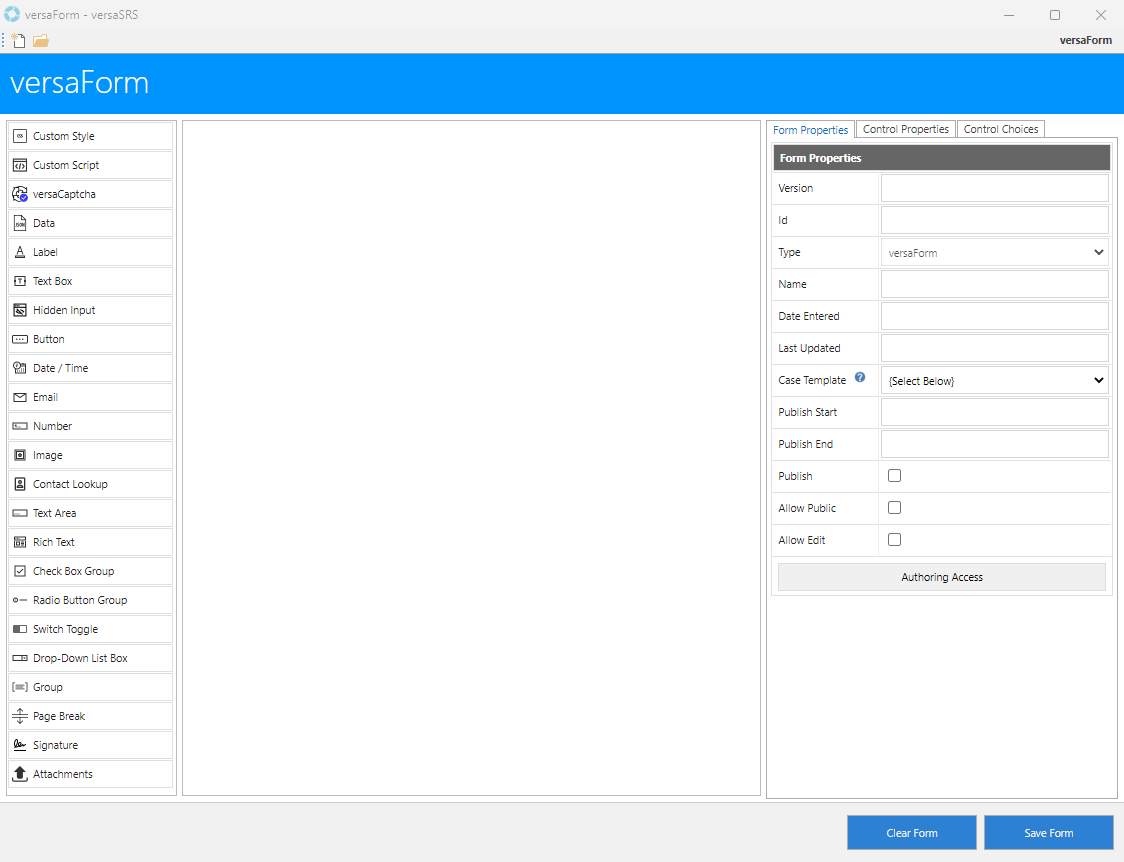
All Controls on the left side can be dragged and dropped onto the Form area.
Form Properties tab
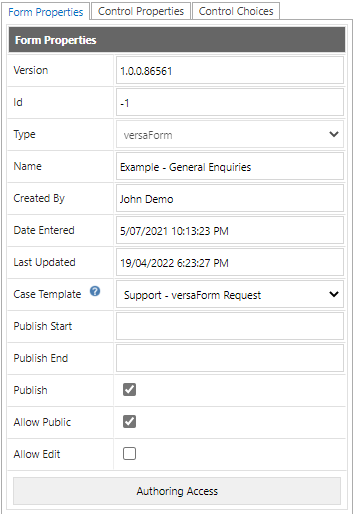
The Form Properties tab contains the following fields:
| Property | Details |
|---|---|
| Id | The ID of the Form. This is a non-editable field, it generates a new FormID after saving the Form. |
| Type | The type of the Form, will display as either versaForm or versaSurvey, cannot be changed |
| Name | The name given to the Form |
| Created By | This field is automatically populated with the First and Last Name of the User that created the Form |
| Date Entered | This field is automatically populated by the application with the date that the Form was created |
| Last Updated | This field is automatically populated by the application with the date that the Form was last updated |
| Case Template | Defines the Case Template that will be used for the Form submissions.
Setting a Case Template here will result in a Case being logged in versaSRS when the Form is submitted using the categorisations of the Template. If a Case Template is not set then no Case will be logged when the Form is submitted. |
| Publish Start | The publication date of the Form. From this date the Form will be available for submissions. If you set a value here you will need to input a value in the Publish End field. |
| Publish End | The end of the publication date for the Form. From this date the Form will no longer be available for submissions. Only set this value if you require an expiry date for accepting submissions. |
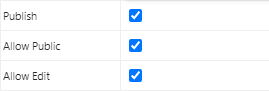
| Publish | Allows the Form to be viewed within versaSRS |
| Allow Public | Makes the Form publicly accessible, meaning it can be viewed in SRSConnect and via external links |
| Allow Edit | Allows submissions to be saved and later updated within versaSRS |
| Authoring Access | Controls which Users can see and make edits to the Form in the versaForm Library |
Authoring Access
versaForms include an Authoring Access button on the Form Properties tab that allows you to control which Users can access and make edits to the Form.
By default the User that created the Form will be able to access it and will not appear in the Granted Access list. To add Users to the list click the Authoring Access button then move Users from the Available Users list to the Granted Access list by double-clicking the Users name or using the > button.
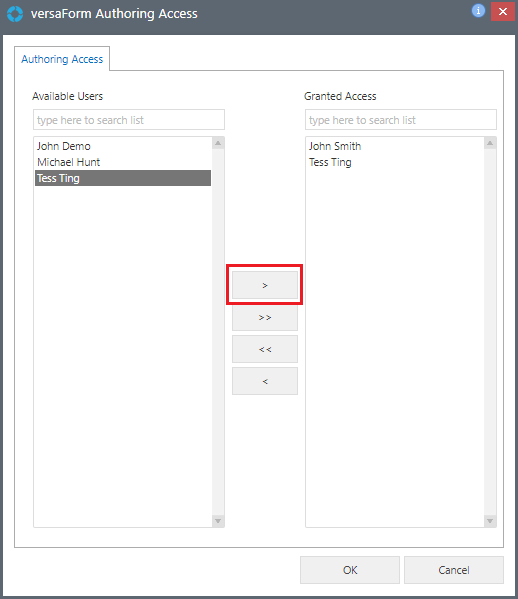
To revoke access do the reverse of the above instructions and remove the User(s) from the Granted Access list.
Control Properties tab
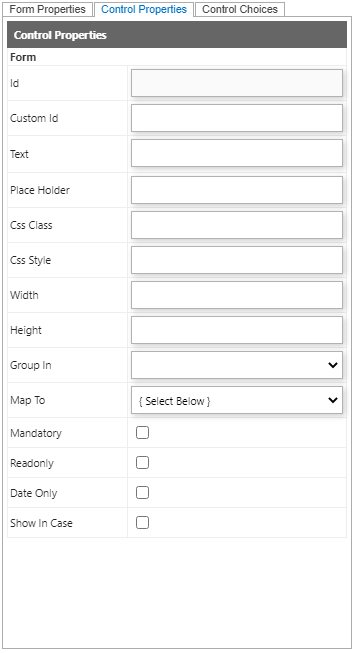
The Control Properties tab contains the following visible fields:
| Property | Details |
|---|---|
| Id | The ID of the Controls. This is a non-editable field, it generates a new ID when a Control is dragged and dropped into the Form field. |
| CustomId | Allows a Custom Id to be set for the Control |
| Text | The Text value of the Form Control; also supports HTML |
| Place Holder | Adds 'place holder' text to the Control, shown as the initial input within a text box that will be replaced once the user begins typing |
| Css Class | Defines the CSS Classes which are used in Custom Style Control, multiple Classes can be added into this field (ensure a space is added between each Class). For example: wrapper formControl |
| Css Style | Defines inline CSS Styles, multiple Styles can be added into this field (ensure a semi colon ; is placed at the end of the different Styles). For example: width: 250px; height: 100px; |
| Width | The width of the Controls. For example: 250px |
| Height | The height of the Controls. For example: 100px |
| Group In | Allows the Group_Container to be grouped under the selected Group. For example: select GroupContainer42 in Group_Container43, all Custom Styles and Scripts under Group_Container43 will inherit from Group_Container42 |
| Map to | The Destination fields correspond to fields in the Case within versaSRS when a new Case is created. Note: A Case Template will need to be assigned to the Form. |
| Mandatory | Mandatory fields for the Form. A message will be populated and all mandatory fields highlighted if the Submit button is selected and any mandatory fields are empty. |
| Readonly | The Control will be in read only mode if it is selected |
| Show in Case | Allows the Control to be shown in Case Details. If 'Show in Case' is unchecked in a Text Area and the Form has a Case Template defined, once the Form is submitted the Text Area will not be shown in the Case Details, however it will still be shown on the Forms tab within the newly created Case. |
Control Choices tab
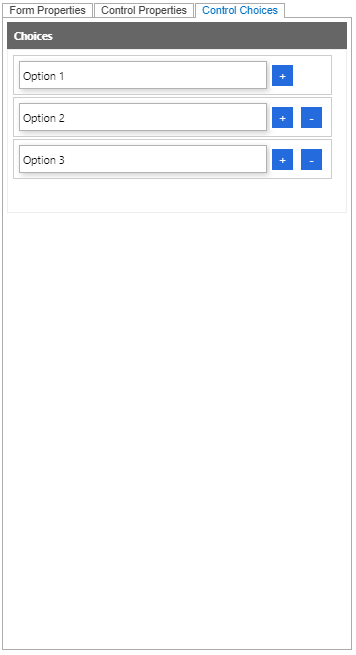
The Control Properties tab is only for Check Box Group, Radio Button Group, Switch Toggle, and Drop Down List Box. It contains plus (+) and minus (-) buttons that allow you to add and remove choices.
My Forms in SRSConnect
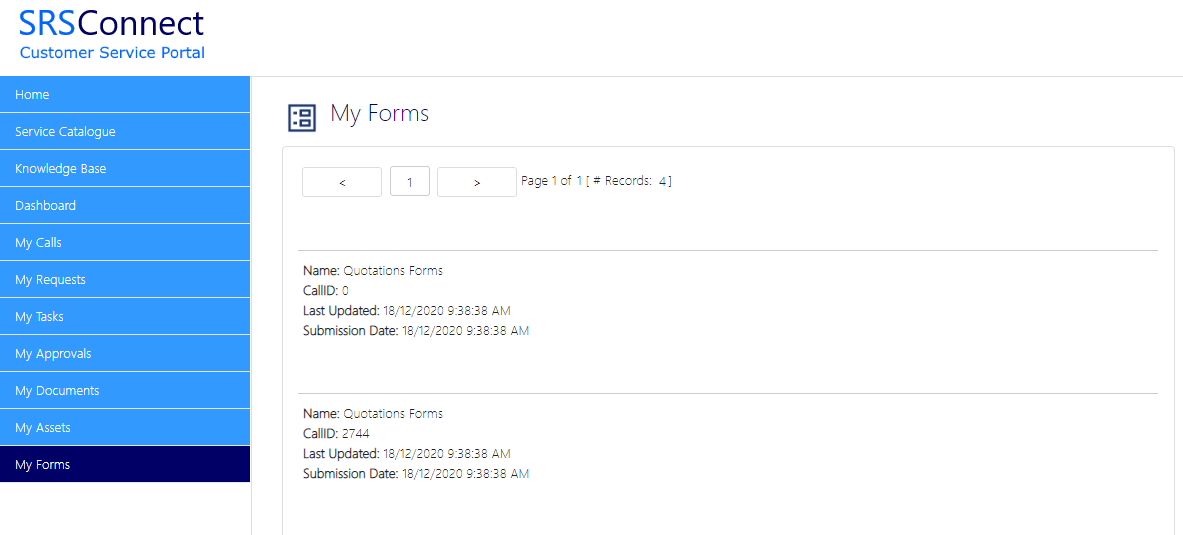
When Forms are submitted the data input will be visible in SRSConnect when licensed and non-licensed versaSRS Users are logged in. The My Forms tab within SRSConnect allows the clients to view all results without the need to be licensed users.
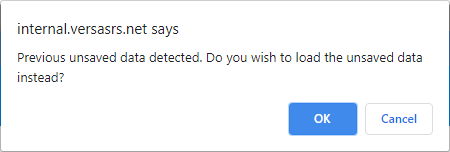
When a Form has the Allow Edit checkbox ticked it is possible to save the Form instead of Submitting it.
A warning message will be populated when a Form is saved but not submitted.
The Submission Date will not be visible if the Form is saved and not submitted (pictured below).
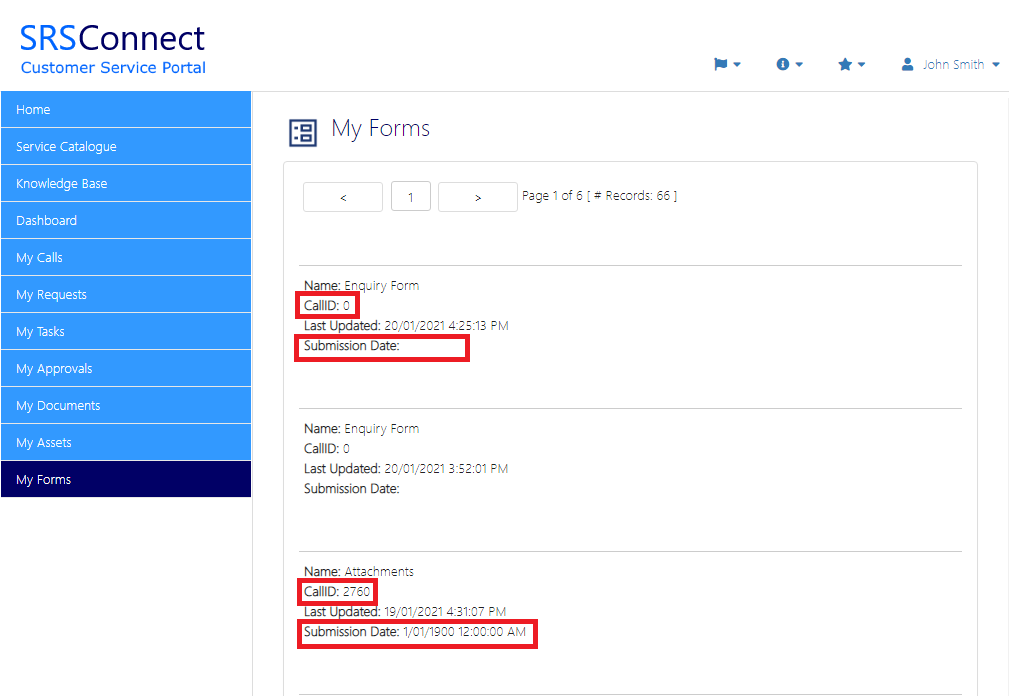
If there is no Case Template set for the Form the CallID of the submitted Form will be 0, and no Case will be created in versaSRS.
Common Errors
When attempting to access a versaForm sometimes the User will be presented with an error message.
| Error | Details |
|---|---|
| Form Not Available. ErrorCode: 1004 |
This error will appear when the User tries to access the versaForm via SRSConnect. The Form does not have the Publish checkbox ticked and therefore cannot be accessed outside of versaSRS. |
| Unauthorized Access. ErrorCode: 1006 |
This error will appear when the User tries to access the versaForm via SRSConnect. The Form does not have the Allow Public checkbox ticked and the User is not logged in to SRSConnect. |